Monday 30 June 2008

HP Photosmart Essential 3.0 download

Free Download HP Photosmart Essential 3.0

Another Good release by HP, the HP Photosmart Essential 3.0. you might be aware of what the photosmart essential is! Here is the quick introduction again.

To make it simple. HP Photosmart Essential 3.0 is free photo sharing and editing software that allows you to organize, edit, share, and print your digital photos.HP Photosmart Essential Software is a All-in-one photo tool for your digital photos.

HP Photosmart essential 3.0 is compatible with Windows Vista and Windows XP.Below are the system requirements for the Photosmart Essential Photo Software 3.0

PC with Pentium II 300 MHz or higher processor, Microsoft® Windows XP1 or Microsoft® Windows Vista®, Microsoft® Internet Explorer 6.0 or higher, minimum 128 MB RAM and 95 MB free, 16.6 MB download hard drive space for installation.Download the HP Photosmart essential 3.0 for free from the below weblinks

Whats New In HP Photosmart Essential 3.0?


* New interface combines simplicity with elegance, making it a pleasure to easily enjoy your photos.

* Find, organize and enjoy your photos with ease by date, tags, folders and favorites.

* Personalized home page provides quick access to your most recent photos.

* Fix photos in a jiffy with great edit tools like automatic red eye and pet eye correction.

* Print Lab quality photos at home - The first time, every time.

* Optional on-screen guides provide support and hints for digital photography beginners.


You can download the Latest version of the HP Photosmart Essential 3.0 from the below weblink.

Click Here to Download the HP Photosmart Essential 3.0 for free

(Direct Link) pse_300_enu.exe Size 16.7 Mb

Photosmart Essential 2.5 and Version 3.0 Users need to Download the Below Patch inorder to overcome the following error

HP Photosmart Essential v2.5 and v3.0 Image Unloader Application HpqSRmon.exe Frequently Crashes in Windows Vista

Click Here To Download the Patch for Photosmart essential 2.5 and 3.0 versions

Update: HP Photosmart Essential Version 3.5 Released click here to download or upgrade to photosmart essential 3.5

Thanks

Thursday 26 June 2008

Scanner Communication Error In Windows Vista and the tablet PC patch

Enable Scanning on Vista Computer with Tablet Drivers Patch

This is a little update from hp to the G4050 scanner where the patch would resolve the conflict between the HP scanning software and the tablet drivers installed on windows vista computer.

As per HP The major symptoms of this conflict are usually that the scanning software will try to start and a message indicates a problem. This is usually followed by a message indicating a "Scanner Communication Error."

So if you run into such errors, install the below patch

scanjet_vista_tablet_patch.exe Version 1.0

The above patch is compatible with Microsoft windows vista , Microsoft Windows Vista(64-bit)

Hopefully this post helps some or the other!!

Thanks!!
HP Answers

HP DeskJet 460 Series Printer Bluetooth Configuration And Wireless Printing

HP Deskjet 460, 460c, 460cb, 460wbt, and 460wf series Printers. How to Setting Up and Configure Bluetooth Wireless Printing For Mobile Printers. Its as simples as that configuring your bluetooth wireless printer. Take a look at the below alternate solution on how to configure bluetooth wireless printing.

1. Connect the printer to the computer by using USB cable and then turn ON Printer

2. Insert HP Bluetooth wireless printer card, with the lights facing up, into the CF card slot of Printer.

Note: The Bluetooth card has one light with two colors: when the card is plugged in, the green light will be on;when there is Bluetooth data communication, the orange light will be blinking.

3.Insert Printer driver CD in to drive.

4. Click on option "Install Printer Driver"

5. In Choose Setup Language wizard, select " English " and then click Ok.

6. In " Welcome to the HP Deskjet 460 series Setup Wizard ", Click NExt.

7. In " Connection Type " Wizard, select " Other ", then click Next.

8. If it asks for port type then I suggest you to select TBP1( or BTH001).

9. In "Installation Type Wizard", select" Typical Installation (Recommended) and click Install.

10. This will start the installation of Printer in Blue tooth mode.

11. Click Finish, When it prompts.

This should successfully install the Printer driver in wireless mode. After completion of installation process, please disconnect the USB cable betwen Printer and computer.Then Try to print a page, this should successfully print out a page and resolve the issue.


Note :
------

Make sure the printer is within range of the Bluetooth sending device. Bluetooth printing allows wireless printing up to 10 meters (30 feet).

If the printer does not print, please follow the below steps:

1.Please click Start >>> Control Panel >>> Printers and other Hardware >>> Printers and Faxes.

2.Please right click on the Hp Deskjet 460c series icon(check marked) there and select Properties. A Window will open.

3.Click on the 'Ports' tab and select the 'deskjet 460s/n my62a4zork' port from the list.

4. Click Apply and OK.

Then try printing.

Refer the below webpages for help:

HP Deskjet 460, 460c, 460cb, 460wbt, and 460wf series Printers Wireless Printing

Alternatively you can check the below weblink for the more eloborated instructions on Configuring HP Deskjet 460 mobile printer.

HP Deskjet 460 series Bluetooth Wireless Printing

Thanks!!
HP Answers

Installing and Adding a network printer for all Users

Adding a Network Printer For all users In Windows XP, 2000, and Windows 2003

Windows 2000, XP and 2003 have the capability to have a Network Printer so that it is automatically available to any user that logs on at that computer. Unfortunately, the Add Printer wizard does not expose that capability - it can only add a Network Printer for the currently logged on user. So to add a printer globally (for all users) you have to a different tool.

The PrintUIEntry function of printui.dll has options for performing most printer management functions. It can perform these functions either on the same computer that printui.dll is running on or on another computer (i.e remotely). The general purpose rundll32 command can be used to execute PrintUIEntry function of printui.dll.

Some things to keep in mind:

* The function for adding a printer globally is /ga. Globally in this context means that the action applies to all
and any users that happen to logon at the target computer.
* The corresponding function for deleting a printer globally is /gd. If you attempt to delete a global printer by using
the
* Delete function in the printer's context menu, it will appear to delete, but will reappear when the Print Spooler
service is restarted.
* Only printers previously added using the /ga function can be deleted using /gd.
* You have to have administrative rights and permissions on the target computer to use these functions.
* If a printer is added remotely using the /ga function, it will not appear to the user until the Print Spooler service
is restarted or the user next logs on. You can restart the print spooler remotely using these commands:
sc \\targetcomputername stop spooler
sc \\targetcomputername start spooler

Like any other commands these commands can be used inside a command file, such as addglobalprinterremotely (see below).
Here's a way of "installing" network printers on workstations so that they are available to all users (remotely).

Create a text file and paste (or key) the following into the .cmd file (e.g. AddGlobalPrinterRemotely.cmd)

rundll32 printui.dll,PrintUIEntry /ga /c\\%1 /n\\%2
start /wait sc \\%1 stop spooler
start /wait sc \\%1 start spooler

abc pserver\p1
Then, at a command prompt key:

addglobalprinterremotely targetcomputername printservername\printersharename

For example to install the printer \\pserver\p1 on the workstation abc:

addglobalprinterremotely
To find out more about the rundll32 printui.dll,PrintUIEntry command, key (case sensitive):

rundll32 printui.dll,PrintUIEntry /?

Here's some details:

/c specifies the computer which is to be the target of the requested action.

If /c is not specified, the local computer is assumed. In other words, the /c option allows you to do printer management things on other computers without actually physically being there (i.e. remotely).

/n specifies which network printer is to be, in this case, added using the printer's UNC name ( \\servername\printersharename ).

/? is understood by PrintUIEntry to be a request for its Help information, which is displayed in a separate window.

The "start /wait" command runs the command (e.g. sc), then waits until the command actually terminates. Stopping and starting the print spooler takes a while, so without this, the next command (e.g. sc ... start spooler) may run before the spooler is actually stopped.

Thanks!!
HP Answers

Friday 6 June 2008

How To Recover, Reset Joomla 1.5 Super Administrator password?

Forgot your joomla super administrator password?

Did you forget your joomla Super Administrator password? Are u unable to login to joomla as a admin? Do you want to reset(change) the Joomla Super Administrator password?This Admin password Recovery for Joomla 1.5 or Joomla1.5.4 and above is here

If you forget or lost the admin or super administrator password, i will show you the way to recover probably reset the Joomla 1.5.0 1.5.1, 1.5.2, 1.5.3 Joomla1.5.4 Joomla 1.5.7 administrator password.there is a very easy way to reset or change, just follow the below screens and the steps to Reset the Password and recover joomla administrator password

First You need to have the access to your hosting control panel, i.e where your joomla is currently hosted. Did you login to your hosting? I think you are doing it right now.

As you logged into your hosting control panel, you need to further login to your MySQL database, via phpmyadmin, once you are there you can see a list of tables of joomla , scroll down and find jos_users and click on it and follow the below screens for further instructions.
(Click on the Images to have a bigger view)

Click on Jos_users, then click on browse on the right window, get you head down and check for administrator user or whichever you want to reset, checkmark the box and click on the pencil icon beside it(its the edit button), immediately you will have the below screen which allows you to change the password. follow the steps in the below screen.


In the password filed select the function value as md5 from the drop down and clear the value and type your own password and click on save at the bottom.You are done!! login with the password that you created. This works with any veriosn of Joomla 1.5 Joomla1.5.4 or above, i am not pretty sure about the joomla previous versions.

Check the below weblink on how to reset the joomla super administrator password for previous versions of joomla 1.0

Password Reset for joomla 1.0.13

Alternatively you can try the Joomla Administrator password recovery form here

I hope that helps a lot, post your comments on this tutorial on how to reset the joomla super administrator password.

Download the Latest Versions Of Joomla from the Official joomla Website Below. I hope this will be a great guide and tutorial in recovering joomla administrator password. please post your comments

Download Joomla!

Download Joomla! 1.5.x

LANGUAGE
VERSION
DOWNLOAD
English (UK) 1.5.7 Full Package ZIP
English (UK) 1.5.6 to 1.5.7 Upgrade Package ZIP


Download other Joomla 1.5.x packages »

Download Joomla! 1.0.x

LANGUAGE
VERSION
DOWNLOAD
English (UK) 1.0.15 Full Package ZIP
English (UK) 1.0.14 to 1.0.15 Upgrade Package ZIP


Monday 2 June 2008

How To Remove Blue Colour Background of Desktop Icons

How to remove blue colour background behind desktop icons and Blue highlighted text under desktop icons ? Follow the rest of the post to know why did your desktop icons changed or turned into blue color and bring back your desktop icons to normal.

Sometimes you might experience a blue colour background behind the desktop icons , this might happen without your knowledge or sometime you might have changed the settings. I will explain you how to remove the blue colour background beyond the desktop icons and make it look transparent in windows xp and windows vista operating systems. it might cause due to unknow n malware or spyware on your pcs..first try scanning your pc for any such spywares.

If you desktop Icons are looking as shown below then follow the solution then How to Remove the Background Color of the Desktop Icons, just scroll down, you are just near it doing it.


Right Click on My Computer Icon and Click on Properties,

Click on advanced tab and click on settings under the Performance

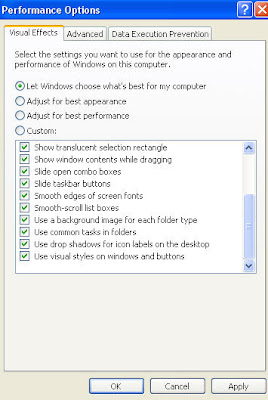
Under Visual Effects, select the option that says "Let Windows chose whats Best For My Computer"


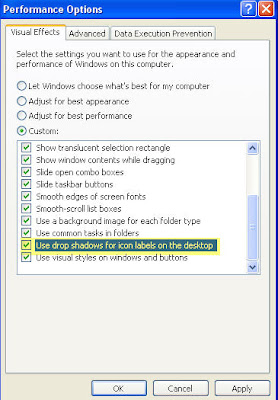
Alternatively If you are using custom Setting, Make sure that the option that says
"Use Drop Shadows for icon labels on the desktop" is checked

Click on Apply and Ok to reflect the changes..Hopefully the desktop icons are now back to normal..is that helpful?

Alternatively..check this settings. right click on your desktop and click on Arrange Icons By-->Lock Web Items On Desktop, make sure it is unchecked as shown below.


Also check for any active desktop options that might be causing the issue. Right Click your mouse-->Click on Properties.Click on desktop and click on customize then select the web tab and uncheck all the options in the Web Page box and also uncheck Lock desktop items to get rid of blue black colour shade ,check the below screen for more information.


This process should remove blue colour shade or shadow behind desktop icons. hope the above solutions help in getting rid of the blue or black background behind desktop icons and desktop items.Discuss using comments section at the bottom

Thanks!!
HP Answers