Thursday 31 July 2008

Sony Ericsson PC Suite Text Messages Backup Folder Location On PC

As said in the earlier post that the PC suite application stores information in two different locations on your PC. You already know the synchronisation folder , Click here to refer back. Lets see where the sony ericsson's PC suite's text messages are stored in the PC

Sony Ericsson PC Suite Text Messages Backup Folder Location On PC:

Make sure you selected to show hidden files and folders from Tools--Folder options--Select Show hidden files and folders in windows xp.


Then go to the following location on your PC, be carefull about the following location

C:\Documents and Settings\All Users\Application Data\Sony Ericsson

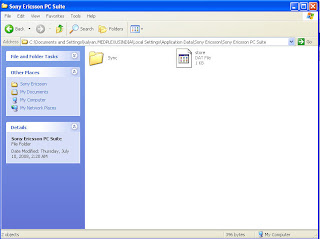
C:\Documents and Settings\All Users\Application Data\Sony Ericsson\Sony Ericsson PC Suite

As you can see in the above image there are plenty folders which refer to different points of the sony ericsson PC suite. As we need the stored SMS folder, just Double click on the Document folder for the stored, sent and recevied text messages.


It contains all the sms that you sent/read using the sony ericsson pc suite, stored in two formats rcv0000x.num and rcv0000x.SMS, open .SMS files with notepad you will have the readable format of the message. For more information on what is stored in other folder, just explore them and post some information here as comments.

Sony ericsson's PC suite profile will be stored in the following location

C:\Documents and Settings\All Users\Application Data\Sony Ericsson\Sony Ericsson PC Suite\Common\Profiles

Thanks!!
HP Answers
Sony Ericsson PC Suite Synchronization and Backup Folder on PC

Would you like to know the Sony Ericsson's PC Suite 3.209 Synchronisation folder and the Back up folders on your PC? You are at the right place!!

Sony Ericsson PC Suite uses two different locations to store the data like Synchronised Calendar, Contacts, Tasks , sent/received SMS information. I recommend you to back the following explained folder for future reference and experiments.

Sony Ericsson PC Suite Synchronisation Folder Location on PC:

Make sure you selected to show hidden files and folders from Tools--Folder options--Select Show hidden files and folders in windows xp.


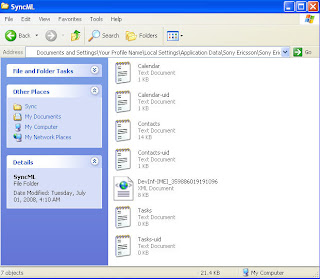
C:\Documents and Settings\Your Profile Name\Local Settings\Application Data\Sony Ericsson\Sony Ericsson PC Suite

Just double click on Sync-->SyncML folders you have all the synchronisation data as in the below screen.

Calendar Calendar-uid Contacts Contacts-uid Tasks Tasks-uid and an xml which refers your mobile IMEI , open them you will have the needed information.

Click Here to Know Sony Ericsson's PC Suite Text Messages Backup Folder On PC

It might be more useful when the contacts,calendar,tasks in your phone are acceidentally deleted or corrupted

Thanks!!
HP Answers

Tuesday 22 July 2008

How To Backup and Restore Phone Data Using Sony Ericsson PCSuite?

Backup Phone Data Using Sony Ericsson PCSuite 3.2

The first time the Backup & Restore window is launched, all the items to be backed up are checked by default. The next time, the Backup & Restore window is launched, it keeps track of which items were selected previously. Depending on the capabilities of your phone, the items available to backup are:

Contacts
Calendar
Tasks
Notes
Bookmarks
Note:

If your phone contains no data in the selected backup categories, no backup will be performed.

To backup one or several items, proceed as follows:

  1. In the Items to backup list on the left, check the item(s) you want to backup.
  2. Click the Backup phone button.
  3. The backup process starts. A backup progress screen is displayed indicating the progression status (In Progress, Errors, Success).
  4. To cancel the backup process, click the Cancel button.
  5. When the backup process is successfully completed, a backup finished screen appears, and the new backup is displayed on the list of the phone backups.

Warning!

The Phone backups list on the right remembers the last 10 backups only. Any previous backups will be lost.

Restore Phone Data Using Sony Ericsson PCSuite 3.2

The restore operation consists of selecting a backup file and running the restore operation on one or more saved item categories.

Warning!

For each category, any modifications on your phone that were not backed up will be lost: the phone contents are deleted and replaced by the backup contents.

To restore one or more archive(s), proceed as follows:

In the Phone backups list on the right, select an archive.
Note: Double-clicking an item from this list displays the selected backup details: Date, Phone name, Phone model, categories.

  1. Click the Restore phone button.
  2. A restore warning screen appears. It displays a warning message and the list of backup categories available in the backup file. The categories that are not available will be greyed out.
  3. Check the category/categories you want to restore.
  4. Click Yes to launch the restore process.
  5. The restore process starts. A restore progress screen is displayed indicating the general progress of the restore (In Progress, Errors, Success).
When the restore process is successfully completed, a restore finished screen appears.

It is important and essential to back up your phone content on a regular basis.

Sony Ericsson PC Suite Synchronization and Backup Folder on PC

Click Here to Know Sony Ericsson's PC Suite Text Messages Backup Folder On PC

Thanks!!
HP Answers

Sony Ericsson PC Suite 3.2 Backup and Restore Phone Data

Sony Ericsson PCSuite 3.2 Offers intresting and most awaited feature to backup and restore your phone data. If you would like to know how to back and restore your sony ericsson phone data, continue reading this post!

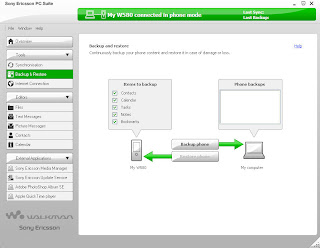
The Backup & Restore window allows you to backup your phone content and restore it in case of damage or loss.

Depending on the capabilities of your phone, you can backup your contacts, calendar, tasks, notes and/or bookmarks.

If your phone is disconnected or connected in Mass storage/Media transfer mode, no communication/operation is possible. Your phone must be connected in Phone mode to be able to backup and restore your items.

Note:

Mass storage mode is also called File transfer mode on some phones.

The Backup & Restore window can be accessed by clicking the Backup & Restore button located in the Tools group.

The date of your last backup is displayed to the right of the Status bar.

Backup & Restore window

Above the phone image, to the left of the Backup & Restore window, the items to backup (contacts, calendar, tasks, notes and/or bookmarks) are displayed. These items can be selected or unselected by using the checkboxes. By default, all items are selected.


Above the computer image, to the right of the Backup & Restore window, a list of phone backups is displayed.

The Backup phone button allows you to start the backup process. During the process, a progress window is displayed. At the end of the backup process, a summary window is displayed.

The Restore phone button allows you to start the restore process. You should select a file that has previously been backed-up in the drop-down list. During the restore process, a progress window is displayed. At the end of the restore process, a summary window is displayed.

Note:

If you double-click a backup file, the Backup properties window appears displaying the backup file information.

Click Here to Know How To Back Up and Restore Phone Data


Sony Ericsson PC Suite Synchronization and Backup Folder on PC

Click Here to Know Sony Ericsson's PC Suite Text Messages Backup Folder On PC

Thanks!!
HP Answers

Performing TMA Self Test For HP G4050 Scanjet Scanner

Want to Check whether the TMA of the G4050 scanner is working properly? then first you need to know the different areas of the G4050 scanner. Check the Below Video.


Follow The Below steps to perform the TMS Self Test To check the basic functionality.

1) Disconnect the USB cable from the back of the scanner.

2) Connect the cable from the document cover (TMA) to the TMA port on the back of the scanner base unit.

3) With the power module connected to the power source, connect the power module cable to the back of the scanner.

NOTE: If the power switch on the back of the scanner is in the on position, the blue LED located above the buttons on the document cover (TMA) illuminates.

4) If the power switch located on the back of the scanner is in the On position, then change it to the Off position.

5) Switch the power on.

6) Once both the lamp carriage in the base unit and the lamp carriage in the TMA return to the home position then switch the power off.

7) Lift the scanner lid and remove the TMA glass cover to be able to see the TMA lamp carriage.

8) Press and hold the Scan Film ( ) and Copy ( ) buttons down, and set the power switch to the On position.

When the base unit lamp carriage starts to move, release both the buttons.

9) During a successful TMA self test, the scanner does the following:

The TMA lamp illuminates.

The TMA lamp carriage moves the full length of the TMA window, and then returns to the home position.

The TMA lamp turns off.

To end the self test, set the power switch to the Off position.

If the TMA self test results were as described above, then the test was successful

Thanks!!
HP Answers

Sunday 20 July 2008

Scanning in Windows Vista Using Windows Photo Gallery

How to scan a picture or document in/with Windows Vista using Windows Photo Gallery?

Please follow these steps:-

Before you begin, make sure that you've installed your scanner on the computer and that the scanner is turned on. no other software is necessary. windows vista has a built in software called windows Photo Gallery which we can make use for scanning pictures and documents.

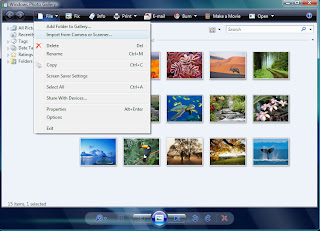
1.Open Windows Photo Gallery by clicking the Start button, clicking All Programs , and then clicking Windows Photo Gallery .


2.Click File , and then click Import from Camera or Scanner .


3.In the Import Pictures and Videos window, click the scanner that you want to use, and then click Import .

4.In the New Scan dialog box, click the Profile list, and then click Photo . The default settings for scanning a picture are automatically displayed.

5.If you're using a scanner with a document feeder, click the Paper size list, and then click the size of the picture that you've placed on the scanner or click the size that most closely matches the picture.

6.Click the Color format list, and then click the color format that you want the scanned file to display.

7.Click the File type list, and then click the file type that you want to use to save the scanned file.

8.Click the Resolution (DPI) list, and then click the
resolution , in dots per inch, that you want to use.

9.Adjust the brightness and contrast settings or type the values that you want to use.

10.To see how the picture will appear when it is scanned, click Preview . If needed, modify the scan settings, and then preview the picture again. Repeat these steps until you're satisfied with the preview results. Some scanners might require you to place the picture in the document feeder each time that you scan.

11.Click Scan . When the scan is complete, Windows Photo Gallery prompts you to
tag the picture so that it's easier to organize or find later.

12.In the Tag these pictures (optional) list, type a tag name, and then click Import . Windows Photo Gallery displays the picture so you can view, fix, or organize it.


To change where Windows Photo Gallery stores scanned pictures:-


1.Open Windows Photo Gallery by clicking the Start button , clicking All Programs , and then clicking Windows Photo Gallery .

2. Click File , and then click Options .

3. Click the Import tab, click the Settings for list, and then click Scanners .

4. Click Browse next to the Import to list, and then browse to the location where you want Windows Photo Gallery to automatically store pictures that you scan.

Thanks!!
HP Answers

Saturday 19 July 2008

Add-Ons For HP Photosmart Essential 3.0 and 3.5

Want To Do more with HP Photosmart Essential 3.0 and version 3.5?
Besides organizing, importing and editing photos with photosmart essential, You can enhance HP Photosmart Essential by installing Add-ons created by HP and third-party vendors. Add-ons makes the photosmart essential even more fun and creative by adding new functionality or new themes and designs for existing capabilities.

What Can I do With HP Photosmart Essential Add-Ons?
  • Create Greeting Cards
  • Create Personal Calendars
  • Create DVD Slide Shows
  • Create Scrapbooks and Even More...
Where Can I get these Add-Ons?

Visit the HP Photosmart Essential Add-Ons Web site to view and download available Add-ons. Not all Add-ons are available in all countries/regions; some are free, and others are offered for a small charge. Visit the site regularly to check for new Add-ons


ArcSoft Print Creations- Cards

Create and print photo greeting cards at home. File size: 23MB

ArcSoft Print Creations- Calendars

Create and print photo calendars with your important dates at home. File size: 22MB

ArcSoft Print Creations - Scrapbook

Create and print scrapbook pages, collages and more. File size: 28MB

ArcSoft DVD SlideShow

Create rich slideshows of your favorite photos and videos to burn to CD/DVD. File size: 39MB

How do I install and use these add-ons with HP Photosmart Essential ?

Simple!! Download then and run the Installation files and follow the onscreen instructions. After the installation, open the HP Photosmart Essential 3.0 or HP Photosmart Essential 3.5 or whichever is the latest version you have the And Click on Create as shown Below.


Here is the Quick Sample Calendar that i Created from ArcSoft Print Creations

Isn't that beautiful? it just took 2 minutes to create a calendar with Photosmart Essential! get the HP Photosmart Essential 3.0 or 3.5 Here

Hope the above Information Helps you!!

Thanks!!
HP Answers

Thursday 17 July 2008

HP CUE Scanning Flow Component Has Encountered A Problem And Needs To Close

You might encounter HP CUE Scanning Flow Component Has Encountered A Problem And Needs To Close Error ,HP Cue scanning flow component problem or HP Cue scanning flow component Stopped Working errors while scanning from the HP Products in windows Vista and windows XP Operating systems.

The Error might also read as "HP cue scanning flow component problem" when trying to scan something. T0 resolve this error message all you need to is first execute the hpqdstcp.exe file in the C:\Program Files\Hewlett-Packard\Digital Imaging\bin folder.

You are near in solving the error, just Follow This link and perform the steps carefully. the below screen give you a graphical ide on what you should change.

Alternatively,

Click Start->Run
Type Regedit in run
In the registry window expand HKEY_LOCAL_MACHINE-Softwares-Hewlett Packard-DigitalImaging

In the Right window search for ProfileWritePath and double click on it check the path.

it should read %APPDATA%\HP\Digital Imaging\Data\Destination

Change this to %ALLUSERSPROFILE%\HP\Digital Imaging\Data\Destination and click on ok, click the below screen for visual thought.


This would resolve the HP CUE Scanning Flow Component has encountered a problem issue and if the issue persists then completely uninstall and reinstall from lower version to higher version. also try installing the software on new account(create a new user account with administrative privileges from start--control panel-user accounts).

Hope the Above information Might Help some the other, use the comments section to discuss on the HP Cue scanning flow component Error

Thanks!!
HP Answers

Friday 11 July 2008

HP Scanjet G3110 Photo Scanner Reviews and Specifications

HP Scanjet G3110 Photo Scanner (L2698A) Reviews,Features, Specifications And Technical Information

Overview

The HP Scanjet G3110 Photo Scanner series is designed for people who are looking for the easiest way to scan, preserve and restore photos, slides and negatives, plus the flexibility of being able to scan, share, archive and manage documents too.

Features

• Get more from your photos with high-quality scanning and easy restoration.

• Scan multiple photos, slides, negatives or even 3-D objects and save to separate files.

• Turn paperwork into editable documents and easy-to-archive digital files.

HP Scanjet G3110 is flatbed Photo scanner with a bit-depth of 48 , optical scanning resolution upto 4800 and a hardware scanning resolution upto 4800 x 9600 dpi, more importantly the Charge Coupled Device (CCD) technology is the scan technology. Scan speed in preview mode.


HP Scanjet G3100 Photo Scanner Minimum System Requirements:

Microsoft® Windows® XP Home, XP Professional, XP Professional x64, 2000: 500 MHz processor, 128 MB RAM, 450 MB available hard disk space, USB port, CD-ROM drive, 800 x 600 SVGA monitor, 16-bit colour, Microsoft® Windows® Internet Explorer 6 or higher; Windows Vista®, x64: 800 MHz processor, 512 MB RAM, 450 MB available hard disk space, CD-ROM drive, 800 x 600 SVGA monitor, DirectX 9 capable graphics, Microsoft® Windows® Internet Explorer 7

The G3110 is compatible with the following operating systems

Microsoft® Windows® 2000, XP Home, XP Professional, XP Professional x64, XP Media Center; Certified for Windows Vista® ; OS X v10.4.11, v10.5 or higher .

When it comes to the scanning speed the G3110 is qick, below is some information.

Scan speed

10 x 15 cm colour photo to file: about 9 sec for multiple image scan, up to 28 sec for single image scan; 35 mm slides to file: up to 7 sec for multiple image scan, up to 26 sec for single image scan; OCR A4 text page to Microsoft® Word: up to 28 sec for single image scan; 10 x 15 cm colour photo to share/e-mail: up to 21 sec for single image scan; A4 PDF to e-mail: up to 28 sec for single image scan

Power requirements

North America: input voltage 120 VAC (+/- 10%), 50/60 Hz (+/- 3 Hz); rest of world: 100 to 240 VAC (+/- 10%), 50/60 Hz (+/- 3 Hz)

Looking for More information and Specifications about the New HP Scanjet G3110 Photo Scanner? then you need to Go Here

Thanks!!
HP Answers

How To Open Microsoft Office 2007 Files With Microsoft Office 2003

You might me wondering how to open/convert Microsoft office 2007 files with an earlier versions of Microsoft Office(Office 2003, Office 2002, Office 2000) then you are at the right place!!

Microsoft Office 2007 saves the files in different file formats , Below is the list of Microsoft Office 2007 File Formats and Extensions.

Microsoft Office Word 2007 Supported File Formats and File Extensions
  1. Word Document (.docx)
  2. Word Macro-enabled Document (.docm)
  3. Word Template (.dotx)
  4. Word Macro-enabled Document Template (.dotm)
Microsoft Office Excel 2007 Supported File Formats and File Extensions
  1. Excel Workbook (.xlsx)
  2. Excel Macro-enabled Workbook (.xlsm)
  3. Excel Template (.xltx)
  4. Excel Macro-enabled Workbook Template (.xltm)
  5. Excel Binary Workbook (.xlsb)
  6. Excel Add-in (.xlam)
Microsoft Office PowerPoint 2007 Supported File Formats and File Extensions
  1. PowerPoint Presentation (.pptx) [default]
  2. PowerPoint Macro-enabled Presentation (.pptm)
  3. PowerPoint Slide Show (.ppsx)
  4. PowerPoint Macro-enabled Slide Show (.ppsm)
  5. PowerPoint Template (.potx)
  6. PowerPoint Macro-enabled Presentation Template (.potm)
  7. PowerPoint Add-in (.ppam)
Inorder To open Convert Mirosoft Office Word 2007 (.docx),Mirosoft Office Excel 2007 (.xlsx) and the Mirosoft Office PowerPoint 2007 (.pptx) , you just need to download and install Microsoft Office Compatibility Pack for 2007 Office Word, Excel and PowerPoint File Formats

The Microsoft Office 2007 Compatibility Pack Works with Office 2000, Office 2003 amd Office XP

After Installing the Microsoft Office 2007 Compatibility pack your can Open ,Edit, save files in Office 2003 file formats without installing the Microsoft Office 2007, honestly Office 2007 looks awesome and has the great features when compared to the earlier versions of office. I recommend Office 2007

Wednesday 9 July 2008

Sony Ericsson Mobiles Transfer Text Messages to PC

The New Sony erocsson Pc suite 3.2 sounds intresting when it comes to sending and receiving text messages, synchronization, and Backup and Restore features.

If you would like to transfer all your sony ericsson mobiles inbox, outbox, sent text messages(sms messages) to you pc or save them to your pc in a text format then your need to install the Sony ericsson Pc suite 3.2 or higher, you can get Sony ericsson Pc suite 3.2 Here

Inorder to Send a Text Message,receive a text message and save a text messages(mobile phone to pc)-From the Sony Ericsson Pc suite, just follow the below steps.

To access the Send text message window, proceed as follows:

* In the Text messages window, click the New message button, or
* From the menu bar, select Options > New > Message.

The Send text message window is displayed.

Send a text message

This window enables you to enter all the information required to send a text message to one or more recipients.
Buttons

Send


Sends the message you have input to the specified recipient's number.

To...


Open the Select contacts window to extract the recipient's mobile phone number(s) from your mobile phone contacts. The contacts which have been extracted are copied to the recipients' list as if they have been entered manually. You can also enter recipient numbers manually in the relevant field.


Message input field

Enter your message in this field.

A text message has a limit which depends on the service centre that will forward your message. If you exceed this limit, the text message will be split into several messages that will be sent separately. This operation is transparent to the sender. The recipient, however, will receive as many text messages as necessary. An indicator at the bottom right of the window indicates the total number of messages that will be sent.

To receive and read a text message, proceed as follows:

1. In the Text messages window, click the Inbox folder.
When your mobile phone contains messages, they are automatically transferred to the Inbox.
2. Click the Send / Receive button.
If you have received new messages, they are transferred to the Inbox and they appear bold.
3. Double-click the message you want to view.
The Message preview window opens and you can read the content of the message.
4. Click the Close button to return to the Inbox.

Receive and read a text message

To receive and read a text message, proceed as follows:

1. In the Text messages window, click the Inbox folder.
2. When your mobile phone contains messages, they are automatically transferred to the Inbox.
Click the Send / Receive button.
3. If you have received new messages, they are transferred to the Inbox and they appear bold.
4. Double-click the message you want to view.
5. The Message preview window opens and you can read the content of the message.
6. Click the Close button to return to the Inbox.

Reply to a received text message

To reply to a received text message, proceed as follows:

In the Text messages window, click the Inbox folder.
Select the message you want to respond to.
Click the Reply button.
The Send text message window is displayed, and the field corresponding to the recipient’s number is filled in automatically.
To send your response, proceed as you would to send a new text message.

Save Your Sony Ericsson Mobile (sms)text messages to PC

To save a message, proceed as follows:

Select the message you want to save.
In the Options menu, select the Save As... option.
The Save as window opens.
Rename your file (if you want to) in the File name box.
.txt format is displayed by default.
Select the folder path where you want to save your document if the selected folder does not suit you.
Click the Save button.

Also Check the Below screen for better understanding(click on the image to have a bigger view)

Thats all!! The Mobile messages are saved to your PC.

isn't that very easy transferring and saving your mobiles sms(messages) to yourPc?

Tuesday 8 July 2008

Sony Ericsson SEPCSuite.exe has encountered a problem and needs to close

Recently, when i try to sync the contacts of outlook express to my sony ericsson w580 mobile i encountered the folowing error (Sony ericsson Pc Suite 3.2). In addition when i click on the Contacts in the left menu of the sony ericsson PC suite, i get the error as "Reading Mobile Phone's Contacts failed".I present the solution here to overcome this error message.

SEPCSuite.exe has encountered a problem and needs to close. We are sorry for the inconvenience.


Reading Mobile Phone's Contacts failed.

Failed to Read the Mobile Phone Calendar

The reason that this error could occur is the ony Ericsson Device 616 USB Ethernet Emulation (NDIS 5) is not installed or this network connection is disabled, follow the below screen shot and check whether they are enabled and showing up in the task bar(provided the phone is connected in the Phone mode Via USB) .Click on the image to enlarge.


Make sure the Network symbol is showin with cross mark and an usbarrow is howing up in the taskbar tray, I tested this several times it worked for me and I assure this is main cause for the error, if you do not install these drivers then you need to reinstall the appropriate pc suite driver of your phone along with the sony ericsson usb ethernet emulation drivers.

Alternatively,this is the very common error when you use the Sony Ericsson PCSuite, the latest version 3.2, this could cause when you install the 3.2 version over the previous sony ericsson pc suite or when the connectivity of the phone to the computer(pc) is lost. I recommend uninstalling the preious version of the Pcsuite before installing the latest or the new version Sony ericsson Pcsuite. Also delete the related folder of the PCsuite and reboot your pc, check for the latest version and install.

Make Sure the Phone is connected in Phone Mode and always use the back end usb port of the Pc when connecting through USB cable.Check for the Phone icon in the taskbar and green hovers in the menu.

Hope the above tip helps.

Thanks!!
HP Answers.

Thursday 3 July 2008

Sony Ericsson Mobile Phones Photo And Picture Gallery

Sony Ericsson Media Library is the place where you can browse the high resolution picture/photos of the latest sony ericsson mobile phones. If you are a designer or want to edit the mobile phone pictures for personal use then Sony Ericsson Media Library is the right place. There are hundreds of the Sony Ericsson Mobile Phone Picutres to browse in the Sony Ericsson Media Library.

Below Image is an example which is linked from Sony Ericsson Media Library, Click On the respective Links to get the Higher Resolution.

Sony Ericsson serves up game, set and match with Maria Sharapova Design Collection

Design Collection IDC-33


Design Collection Exercise case-Design collection IDC-31 Maria Sharapova

F305 Bowling FrontOpen Polar White


Click Here to Download More Images Of Sony Ericsson Mobile Phones And Designer Collections Released By Sony Ericsson

Wednesday 2 July 2008

Sony Ericsson PC Suite Version 3.2 Download and Quick Guide

The Sony Ericsson PC Suite Version 3.209.00 by avanquest software is released, i was excited about the sony ericsson pc suite 3.2 version. The layout and the style of the pc suite version 3.2 is amazing the features as well.click on the below image to have a seak at the sony ericsson pc suite 3.2 version.

Go download the Sony ericsson PC suite version 3.2 now!! you can download the Sony ericsson pc suite version 3.2 for both windows vista and windows xp all versions from the below weblink.Its amazing with the new interface and the features.

System requirements
  • Pentium II - 233 MHz or more
  • 128 MB RAM
  • 50 MB hard drive space
  • Windows XP (all versions SP1/SP2) or Windows Vista (all versions)
Sony Ericsson PC Suite Version 3.209.00


Latest Update

Sony Ericsson PC Suite 4.0 Download Version 4.006.00 is available for download

Check out other links

Sony Ericsson PC Suite 3.2 Backup and Restore Phone Data

Sony Ericsson PC Suite Text Messages Backup Folder Location On PC

Main User Interface

The interface colour changes according to the Phone connection status:

When the phone is connected in Phone mode, the colour green is displayed on the main user interface.

When the phone is connected in Mass storage mode, the colour orange is displayed on the main user interface.

When the phone is connected in Media transfer mode, the colour blue is displayed on the main user interface.

When the phone is not connected, the colour grey is displayed on the main user interface.

I love the feature os sending text mesaages from the computer to any mobile from the PC suite 3.2.

1) The Text Messages window enables you to handle text messages easily, allowing you to edit and send text messages via the keyboard of your computer. you can even read ,send and save the the text messages in sony ericsson PC suite 3.2.

2) The Picture Messages window enables you to create and manage customised multimedia messages to be sent from your computer or mobile phone to another mobile phone.

These multimedia messages may contain text, retouched pictures or images, graphics and sound that you can customise prior to transmission. The files you can attach to these messages may be of various formats: jpeg, gif, txt, wav, midi, etc.

3) The Synchronisation window allows you to synchronise data between your phone and computer in order to always stay updated on both devices.

Depending on the capabilities of your phone, you can synchronise your contacts, calendar, tasks, notes and bookmarks.

The supported databases are Outlook®, Lotus Notes®, Windows Address Book, Windows Contacts and Windows Calendar. The supported browser is Internet Explorer®.

Your phone must be connected in Phone mode to be able to synchronise. If your phone is disconnected or connected in Mass storage/Media transfer mode, synchronisation is not possible.

4) The Internet Connection window allows you to connect to the Internet using your phone. To use this feature, your phone must be connected in "Phone" mode.

The Internet Connection window can be accessed by clicking the Internet Connection button located in the Tools group. The Internet Connection window displays your current connection status (Offline or Online).

Within the Internet Connection window, you can also:

Manage your connections (create, delete or edit your connections).
View connection information in real time (Operator, Network, Connection time, Data received or sent). View your connection logs.

In addition if you are looking for the updated and the latest version of the sony ericsson theme creator 3.27 you can get it here

1. Themes Creator 3.27 (Windows)
2. Bluetooth Remote Control 3.04 (Windows)
3. Sony Ericsson SDK 2.5.0.2 for the Java ME Platform
4. Themes Creator 3.27
(OS X)
5. Developers' Guidelines - Themes

Thanks!!
HP Answers